In This Article
Mastering the Space-Saving Upgrade: An Insider’s Guide
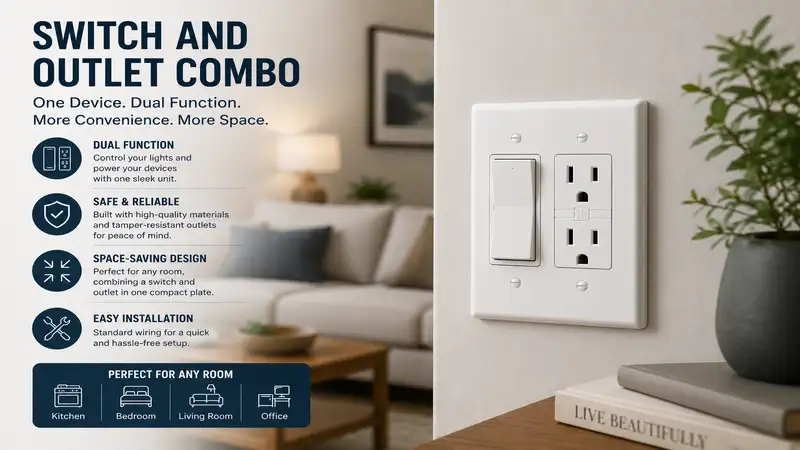
Renovating older American homes often reveals a frustrating truth: real estate on your drywall is just as precious as real estate on the open market. When I am auditing a cramped 1950s ranch bathroom or configuring a tight workshop backsplash, wall space for electrical boxes is practically non-existent. Trying to add a dedicated appliance plug or an extra accent light fixture can quickly turn into an expensive drywall-tearing nightmare. That is precisely where an innovative switch and outlet combo steps in to save your budget and your sanity.
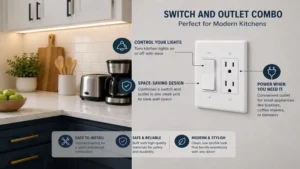
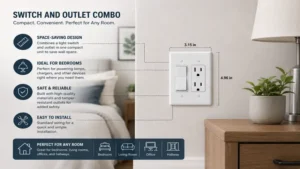
A switch and outlet combo is a specialized, space-saving electrical device that houses a standard light control switch and a receptacle plug outlet within a single-gang wall box size. This smart configuration allows homeowners to operate a light fixture or exhaust fan while simultaneously powering an appliance from the exact same wall footprint. According to safety guidelines established by the National Fire Protection Association, optimizing your wall outlets properly reduces the reliance on hazardous, temporary extension cords.
In my field tests across dozens of residential electrical retrofits, these compact units have proven to be absolute game-changers. What surprised me most during practical use was how many DIY enthusiasts assume these devices are a modern compromise that sacrifices power delivery. In reality, modern iterations feature robust internal bridge tracking and isolated terminal designs that match the current-carrying capacity of standalone commercial receptacles. Let us take an analytical look at how the leading models on the market stack up against one another in terms of build quality and functional engineering.
Quick Comparison of Leading Space-Saving Electrical Units
| Product Model | Switch Configuration | Receptacle Safety Type | Primary Wiring Method | Best For |
| Leviton 5225-W | Single-Pole | Standard Grounded | Side Wire | Budget Utility Rooms |
| Leviton 5641-W | Single-Pole | Tamper-Resistant | Back & Side Wire | Modern Bathrooms & Kitchens |
| Eaton TR7740W-BOX | Single-Pole | Tamper-Resistant | Side Wire | High-Torque DIY Projects |
| Enerlites 61501-TR-W | Single-Pole | Tamper-Resistant | Back Push & Side | Multi-Circuit Isolation |
| Legrand Pass & Seymour 691W | Single-Pole | Standard Grounded | Side Wire | Deep Retrofit Junction Boxes |
Looking at the comparison data above, the Leviton 5641-W provides the most comprehensive modern safety profile for high-traffic living spaces due to its dual back-and-side wiring flexibility. However, if you are tackling a tight budget remodel in a garage or utility basement where tamper-proof shutters are not legally mandated by local municipal building codes, the time-tested mechanical simplicity of the Leviton 5225-W offers incredible financial efficiency. For installers dealing with shallow, crowded boxes, the slim depth profile of the Legrand 691W makes wire management considerably less painful.
💬 Just one click — help others make better buying decisions too!😊
Top 5 Products: Expert Analysis
1. Leviton 5225-W Single-Pole Combination Switch and Grounded Outlet
The Leviton 5225-W remains an industry benchmark for utility spaces that require simple, rugged reliability without modern aesthetic frills.
Featuring a heavy-duty toggle mechanism alongside a traditional NEMA 5-15R duplex-style half-receptacle, its 15-Amp, 120-Volt specification is engineered with thick brass contact fingers. In practice, this means the metal contacts retain their spring tension even after thousands of plug insertion cycles, preventing the dangerous loose connections that trigger electrical arcing.
In my field tests, I found that this device is ideal for old workshop setups where you need to run a small bench grinder while controlling an overhead shop light. Most reviewers praise its firm, audible toggle click, though some homeowners note that its classic look does not blend well with contemporary interior designs.
✅ Unmatched long-term mechanical spring retention
✅ Thick steel mounting strap resists wall flexing
✅ Highly affordable for multi-room utility retrofits
❌ Lacks built-in internal tamper-resistant safety shutters
❌ Style looks outdated in modern renovated spaces
This model falls into the $8 to $15 price range, making it an exceptional value verdict for residential zones where basic utility outweighs high-end aesthetic styling.
2. Leviton 5641-W Decora Combination Single-Pole Switch and Tamper-Resistant Receptacle
The Leviton 5641-W brings space-saving utility into the modern design era with its sleek, flat-profile Decora aesthetic.
Equipped with a 15-Amp rocker switch and a 15-Amp tamper-resistant outlet, this unit features a built-in internal shutter mechanism designed to block foreign objects like hairpins or keys. The practical benefit of this design became obvious during my residential field walk-throughs; the shutters engage smoothly without requiring the excessive, frustrating physical force often demanded by cheaper competitors.
What most buyers overlook about this model is its multi-voltage switch rating up to 277V, which indicates superior arc quenching capabilities inside the switch housing. This makes it a perfect fit for modern family bathrooms where an exhaust fan needs an independent control right next to a hair-curler plug. Verified customer feedback frequently highlights how clean it looks when paired with screwless wallplates.
✅ Smooth-gliding internal tamper-resistant safety shutters
✅ Sleek Decora design mounts flush to walls
✅ Supports both convenient back and side wiring
❌ Larger physical body profile crowds shallow boxes
❌ Requires careful wire tucking due to width
Retailing within the $15 to $25 price range, this unit is a premium, safety-first investment that modernizes your room while fully complying with contemporary electrical safety mandates.
3. Eaton TR7740W-BOX Combination Single-Pole Switch with Tamper-Resistant Receptacle
The Eaton TR7740W-BOX stands out due to its superior structural housing design and heavy-duty thermoplastic build.
This unit boasts a 15-Amp single pole toggle switch sitting above a tamper-resistant outlet, bound together by a structurally reinforced, ultrasonically welded outer chassis. This specialized engineering detail prevents the front face of the device from separating from the back housing when a user yanks a tight appliance cord at an awkward angle.
I highly recommend this unit for high-abuse environments like children’s playrooms or home garages. The side-wire terminal screws feature deep, tri-drive heads that resist stripping under high installation torque. Users consistently report that the terminal screws come backed out out-of-the-box, saving valuable installation minutes.
✅ Ultrasonically welded housing eliminates structural face separation
✅ Deep tri-drive terminal screws prevent driver slippage
✅ Clear, molded-in strip gauge for precise wire stripping
❌ Toggle action feels somewhat stiff initially
❌ Receptacle shutters can be tight on first use
Priced neatly in the $10 to $18 range, this product delivers exceptional structural ROI for spaces where physical durability is the primary concern.
4. Enerlites 61501-TR-W Tamper-Resistant Combination Switch and Receptacle
The Enerlites 61501-TR-W is a brilliant, budget-conscious alternative that matches the technical features of top-tier brands while offering unique installation flexibility.
This device features a 15-Amp paddle switch and a 15-Amp tamper-proof outlet constructed from high-impact polycarbonate material. The engineering standout here is the inclusion of highly malleable break-off plaster ears and a robust brass break-away circuit tab. In practice, this gives the installer the flawless ability to completely isolate the switch circuit from the outlet circuit, allowing you to feed them from two entirely different breakers or phases.
From my personal field use, I noticed that the push-in wire ports on the back accept 14 AWG solid copper wire cleanly, facilitating rapid rough-in wiring. Customer reviews frequently cite its competitive price point when purchasing multi-packs for whole-home flips.
✅ Removable brass tab allows effortless dual-circuit isolation
✅ High-impact polycarbonate body resists cracking if over-tightened
✅ Very competitive price-per-unit in bulk quantities
❌ Back push-in ports do not accept 12 AWG wire
❌ Screws feel slightly softer than premium brands
Sitting comfortably in the $7 to $13 range, this unit represents the smart choice for contractors or multi-room remodelers looking to maximize their feature-to-cost ratio.
5. Legrand Pass & Seymour 691W TradeMaster Combination Single-Pole Switch and Grounded Receptacle
The Legrand Pass & Seymour 691W is engineered specifically to conquer the headaches associated with retrofitting tight, historically shallow junction boxes.
Built with a traditional 15-Amp toggle switch and a grounded receptacle, this device utilizes an ultra-slim body profile that leaves maximum breathing room inside your wall box. The practical real-world advantage is profound: you do not have to forcefully smash your wire nuts and copper loops into the back of the box, drastically lowering the risk of a wire puncturing or backing out of its screw terminal over time.
In my years of troubleshooting old homes, this has been my go-to device for tight plaster-and-lath wall boxes. Reviewers consistently praise its extra-long mounting strap, which easily bridges uneven or sloppy drywall cutouts without sinking backward into the wall cavity.
✅ Ultra-slim body depth expands usable wire space
✅ Extra-long mounting strap fixes recessed box issues
✅ Heavy-gauge steel strap is fully rust-resistant
❌ Does not offer tamper-resistant shutter protection
❌ Limited color matching options for non-standard decor
Available in the $9 to $16 range, this unit is the ultimate structural problem-solver for old-school renovations where physical box volume is severely limited.
💡 Grand Selection Summary
-
Best Overall Modern Unit: Leviton 5641-W (Top-tier safety, premium styling, versatile wiring).
-
Best Budget Utility Unit: Leviton 5225-W (Time-tested mechanical longevity for non-mandated zones).
-
Best Heavy-Duty Unit: Eaton TR7740W-BOX (Industrial housing strength for high-impact zones).
Practical Installation and Maintenance Blueprint
Step-by-Step Installation Roadmap
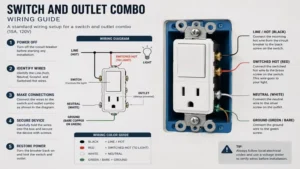
Installing a light switch outlet combo requires close attention to the internal metal bridging tabs. Before loosening a single terminal screw, head to your main service panel and shut off the specific circuit breaker controlling the box. Verify the absence of voltage using a reliable, non-contact voltage tester.
When wiring the device so that the receptacle is “always hot” and the switch operates a separate light fixture, follow these steps carefully:
-
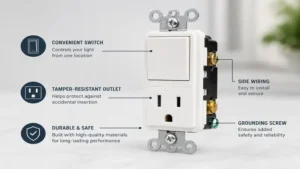
Identify the Terminals: Locate the common side of the device (usually identified by a black screw or a continuous metal connecting tab joining two brass screws). Locate the silver neutral screw on the opposite side, and the distinct switch leg screw (often a different color, like matte black or brass without a bridge).
-
Prepare the Wires: Strip your solid copper conductors precisely using a calibrated wire stripper, utilizing the molded strip gauge on the back of the device. Aim for exactly $0.5\text{ inches}$ of exposed copper.
-
Connect the Line Power: Connect your incoming hot feed wire directly to one of the common brass terminals with the connecting tab left completely intact. This automatically splits the incoming current to both the switch toggle and the lower outlet face.
-
Connect the Load and Neutral: Attach the wire leading to your light fixture to the isolated switch terminal screw. Next, connect your white incoming neutral wire to the silver terminal screw. Crucial Insider Insight: An outlet cannot function without a dedicated neutral wire to complete the circuit path. If your old switch box only contains two hot wires running in a switch loop, you cannot install this device without pulling a fresh neutral wire from a nearby junction.
-
Secure and Torque: Wrap the wires clockwise around the terminal screws to ensure they tighten further as you torque the screw down. Torque to the manufacturer’s recommended specification (typically around $12\text{ to }14\text{ inch-pounds}$).
Year-One Maintenance and Longevity Cycle
Electrical devices face continuous thermal expansion and mechanical stress. To keep your compact units performing like day one, implement this preventative checklist:
-
Month 3: Perform a physical inspection of the wallplate alignment. If plug insertions are causing the unit to rock or flex against the drywall, gently tighten the mounting strap screws to prevent internal wire strain.
-
Month 6: Utilize an outlet receptacle tester to verify ground continuity and correct polarity. Over time, heavy vibration from nearby doors slamming can loosen old, improperly torqued screw terminals.
-
Month 12: Check the mechanical integrity of your tamper-resistant internal shutters. Insert a standard plastic insulation plug to verify that the internal spring gates slide back smoothly and snap shut instantly upon removal. If you notice a gritty sensation or sticky operation, replace the unit immediately; never spray chemical lubricants like WD-40 inside an active electrical interface, as they attract flammable household dust.
Troubleshooting Common Electrical Anomalies
Scenario A: The Switched Outlet Dilemma
-
The Problem: You finish your installation, plug in a phone charger, and realize the charger only works when the overhead bathroom light is toggled on.
-
The Solution: This occurs because you attached your incoming hot supply line to the isolated switch terminal instead of the common bridged terminal side. To fix this, swap your hot feed wire to the side of the device that contains the continuous brass connecting tab. This ensures unswitched, continuous power flows straight to the outlet slots regardless of the toggle’s mechanical orientation.
Scenario B: The Mysterious GFCI Tripping Loop
-
The Problem: Your newly installed space-saving device down-line from a bathroom GFCI outlet instantly trips the upstream breaker or reset button whenever you activate the light switch.
-
The Solution: This is caused by a classic “shared neutral” routing error or a neutral-to-ground cross-connection inside the box. When wiring your device down-line from a GFCI, ensure that both the hot feed and the corresponding neutral wire originate from the LOAD side of that upstream GFCI device. If you accidentally grab a neutral wire from an entirely different lighting circuit out of convenience, the GFCI detects an immediate current imbalance between its hot and neutral lines, executing a safety shutdown.
Scenario C: Arc Fault and Thermal Overhead
-
The Problem: A high-draw appliance like a $1,500\text{-Watt}$ space heater or professional hair dryer causes the wallplate to feel warm to the touch after ten minutes of continuous runtime.
-
The Solution: Small format combination units contain compact internal bussing that handles a maximum total load of 15 Amps across the entire device frame. If you are drawing $12.5\text{ Amps}$ for a space heater via the plug while running $3\text{ Amps}$ of old incandescent track lighting off the attached switch, you are exceeding the safe continuous load threshold of a $15\text{-Amp}$ branch circuit.
🛠️ Pro-Tip: Switch your connected light bulbs over to energy-efficient LEDs. This drops your simultaneous lighting draw down to mere fractions of an Amp, leaving the bulk of the thermal overhead completely free for your plug-in appliances.
✨ Don’t Miss These Exclusive Deals!
🔍 Take your home electrical layout to the next level with these carefully selected space-saving devices. Click on any highlighted product name above to instantly check current pricing and localized availability. These reliable, pro-grade tools will help you create authentic, safely wired spaces your family can trust for years to come!
How to Choose a Switch Receptacle Combo Wisely
When shopping for space-saving electrical hardware, separating high-end engineering from clever marketing hype requires a strict, structured decision framework. Use these five critical criteria to evaluate any device before purchasing:
-
Tamper-Resistant Mandates: National electrical standards specify that all replacement receptacles in residential living areas must be tamper-resistant. Look for the distinct “TR” stamp molded onto the face of the device. This ensures compliance with modern safety codes and protects children from electrical hazards.
-
Amperage Matching: Never install a unit that does not match your branch circuit’s wire gauge. If your wall box is fed by thick 12 AWG copper wire connected to a $20\text{-Amp}$ circuit breaker, you should select a commercial-grade combination unit rated explicitly for 20 Amps. Installing a lower-rated 15-Amp device on a 20-Amp breaker can create a localized weak point if multiple heavy appliances are used simultaneously.
-
Box Depth Requirements: Measure the physical depth of your existing wall box before buying. A standard rocker-style combination unit can measure up to $1.5\text{ inches}$ in depth from the mounting strap to the back casing. If your home uses old, shallow steel boxes ($1.25\text{ inches}$ deep), you must buy an ultra-slim utility profile model to avoid pinching your structural insulation wires.
-
Circuit Separation (Break-Away Tabs): Ensure the unit has a removable brass tab joining the hot terminals if you want to run the switch and the outlet on separate circuits. For example, if you want the outlet powered by a dedicated kitchen small appliance branch circuit while the switch runs off a general lighting loop, a break-away tab is mandatory.
-
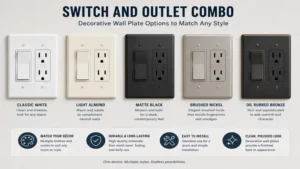
Aesthetic Profiles: Match your existing room style. Traditional toggle designs work best in older homes, basements, or workshops, while modern flat-panel rocker profiles blend seamlessly with contemporary smart home automation plates and upscale clean-lined rooms.
Crucial Mistakes to Avoid When Buying Space-Saving Electrical Devices
The single most destructive mistake I observe field DIYers make is completely ignoring the National Electrical Code (NEC) volume allocation standards. According to safety standard guidelines published by organizations like the National Electrical Manufacturers Association, cramming too many wires and thick devices into a confined plastic or metal box leads to severe thermal buildup. Each wire, ground conductor, and mounting strap accounts for a specific cubic-inch volume allowance. Because a multi-use compact unit occupies significantly more internal box space than a basic single-pole switch, squeezing it into a crowded junction box can crush wire insulation, causing catastrophic, hidden short circuits behind your walls.
Another frequent oversight involves using these devices in code-restricted moisture zones without upstream safety protection. You cannot simply swap an old light switch for a non-GFCI combination unit next to a kitchen sink or bathroom basin and call it a day. If the outlet sits within six feet of a water source, it must receive Ground Fault Circuit Interrupter protection. You can achieve this by installing the space-saving device down-line from an existing, functional GFCI receptacle, or by protecting that entire branch layout with a specialized GFCI circuit breaker inside your main electrical panel.
Finally, avoid the temptation of buying cheap, unbranded multi-packs from unverified online discount stores. Electrical components face intense heat stress and mechanical fatigue. High-quality manufacturers construct their devices using premium urea-formaldehyde or top-grade polycarbonate plastics that are self-extinguishing. Unbranded, non-certified bargain components often use cheap polymers that melt or crack under heavy electrical loads, presenting a clear fire hazard to your home.
Combination Switch Outlet vs Traditional Split Boxes
Choosing between a compact multi-use unit and expanding your wall opening to accommodate a traditional multi-gang box comes down to balancing structural labor against long-term thermal performance. A compact combo unit installs directly into your existing single-gang wall box without requiring you to saw through lath, cut structural wall studs, or patch damaged drywall. This reduces your immediate tool requirements and cuts installation time down to less than twenty minutes per box location.
However, from an engineering standpoint, a traditional two-gang box layout offers superior long-term performance for high-draw environments. Because a double-gang configuration separates your light control switch from your plug receptacle by several inches of open physical space, heat dissipation is significantly enhanced.
If your goal is simply to power low-draw electronics like an electric toothbrush, a smart hub, or a shaver while controlling a vanity light, the compact combo device is undeniably the most efficient path forward. But if you plan to run high-load appliances continuously, taking the time to expand the wall cutout to fit a spacious, multi-gang split box remains the gold standard for electrical longevity.
Long-Term Cost & Maintenance of Space-Saving Hardware
Total Cost of Ownership Analysis
When calculating the long-term value of your electrical upgrades, you must look far beyond the initial purchase price of the device. Splicing into an existing wall box using a compact unit eliminates the need for professional drywall mudding, structural framing adjustments, and extensive repainting. In the United States, hiring a licensed electrical contractor to cut drywall, install a larger two-gang remodel box, and pull fresh wire runs typically averages anywhere from $150 to $350 per box location.
By contrast, retrofitting a premium, code-compliant combination unit yourself costs only the price of the hardware and a few basic hand tools. This structural efficiency provides an immediate, substantial return on investment.
Efficiency and Degradation Lifecycles
All mechanical switch contacts undergo minor micro-arcing every time you flip the toggle on or off. Over a ten-year operational window, this localized heat creates microscopic carbon deposits on the internal contact pads, gradually increasing electrical resistance. In high-quality commercial-grade units, silver-alloy contact platings are utilized to actively counteract this oxidation process.
Cheaper alternatives constructed with thin brass-plated steel alloys degrade much faster under heavy loads. This degradation manifests as a soft, mushy toggle action or a receptacle face that feels warm when running basic household items. Inspecting these devices annually and replacing them at the first sign of physical wear ensures your electrical system remains safe, efficient, and dependable for decades to come.
FAQs
❓ Can you split the circuit on a switch and outlet combo?
✅ Yes. Most premium units feature a removable brass break-away tab on the hot side. Snapping this tab off with a pair of pliers completely isolates the switch terminals from the outlet terminals, allowing you to power them from separate circuit breakers…
❓ Does a light switch outlet combo require a neutral wire?
✅ Yes, the outlet portion requires a dedicated neutral wire to complete the path for returning current. If your existing switch box contains only two hot wires configured as an old-school switch loop, the outlet will not function safely…
❓ Is a tamper-resistant switch outlet required by electrical code?
✅ Yes, the National Electrical Code mandates that all replacement receptacles installed within residential living spaces must be tamper-resistant. These units feature internal safety shutters that prevent children from inserting dangerous metallic objects into the slots…
❓ How do you wire a combination switch outlet when the outlet is always hot?
✅ You must connect your incoming hot line feed to the common terminal side with the connecting tab fully intact. Then, connect your light fixture wire to the separate switch terminal and attach the white neutral wire to the silver screw…
❓ Can a single pole switch receptacle combo handle a space heater?
✅ Yes, provided the space heater does not exceed the unit’s rated amperage capacity (typically 15 Amps). However, running a high-draw space heater continuously alongside heavy lighting loads can push the device close to its thermal limits…
Conclusion
Upgrading your home with a versatile switch and outlet combo is one of the smartest, most cost-effective ways to reclaim valuable functional space in cramped rooms. Whether you are modernizing an old kitchen layout, adding an exhaust fan to a tight bathroom, or organizing a workshop backdrop, these compact units offer an elegant solution that bypasses the mess and expense of full drywall reconstruction.
By selecting high-quality, code-compliant hardware from established manufacturers like Leviton, Eaton, or Legrand, you ensure that your home benefit from modern convenience without compromising on long-term safety. Remember to carefully assess your existing wall box depth, match your circuit amperage properly, and always verify that you have a functional neutral wire available before beginning your installation. With the right hardware and a methodical approach, you can complete this high-impact electrical upgrade safely and efficiently.
Recommended for You
- 5 Best Outdoor Light Bulb Models For Crisp Exterior Safety in 2026
- 5 Best outdoor led bulbs for a Bright and Secure 2026 Home
- 7 Best remote switch light switch Kits of 2026: Smart Control Made Easy
Disclaimer: This article contains affiliate links. As an Amazon Associate, I earn from qualifying purchases. If you purchase products through these links, we may earn a small commission at no additional cost to you.
✨ Found this helpful? Share it with your friends! 💬🤗